If your washing machine is leaking from the front, the door seal is one of the first components to examine. The rubber gasket around the door is designed to flex while maintaining a watertight barrier. Over time, wear, debris, or minor damage can interfere with that seal.
A careful inspection can help you determine whether cleaning is enough or whether replacement may be necessary.
Before You Begin
Always turn off the washing machine and ensure it is not running a cycle. Open the door fully and allow the drum to remain still while you inspect the seal.
You do not need special tools for a basic inspection. A clean cloth and good lighting are usually sufficient.
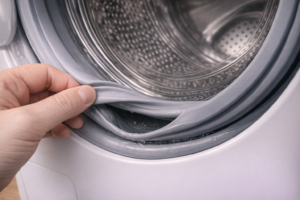
Step 1: Examine the Lower Section First
The bottom portion of the gasket is the most common area for leaks and damage. Water naturally settles there, and debris often collects in the folds.
Gently pull back the rubber at the lower edge and check for:
-
Trapped lint, hair, or small objects
-
Cracks or splits in the rubber
-
Areas that appear stretched or thin
If debris is present, remove it carefully and wipe the area clean before continuing.
Step 2: Check the Inner Lip of the Seal
The inner lip is the part of the gasket that presses against the door glass when closed. This section must remain smooth and flexible to create a proper seal.
Look closely for:
-
Small tears along the edge
-
Surface cracks
-
Rough or uneven sections
Even minor imperfections along the inner lip can allow water to escape during high-pressure cycles.
Step 3: Inspect the Folds for Hidden Damage
Door seals often have deep folds that can conceal wear. Gently spread the folds apart and inspect the interior surfaces.
Pay attention to:
-
Darkened areas that may indicate deterioration
-
Persistent mould or buildup that has hardened
-
Small punctures caused by foreign objects
Avoid using sharp tools during this process, as they can damage the rubber further.
Step 4: Check for Separation From the Frame
The gasket is secured in place by retaining bands. If part of the seal has shifted or pulled away from the drum opening, the seal may not sit evenly.
Look for:
-
Gaps between the rubber and the metal rim
-
Areas where the gasket appears loose
-
Uneven alignment around the door opening
A seal that is misaligned can leak even if the rubber itself is not torn.
Step 5: Assess Flexibility
Gently press on different sections of the gasket. A healthy seal should feel flexible and smooth.
If the rubber feels:
-
Brittle
-
Stiff
-
Warped
It may no longer form a reliable seal during washing.
When Inspection Reveals Damage
If you discover visible cracks, tears, or areas pulling away from the frame, cleaning alone is unlikely to solve the problem.
In that case, you may need to consider whether replacement is appropriate. When a Washing Machine Door Seal Needs Replacement explains when damage is typically beyond recovery.
If you are still determining whether the leak is seal-related, Why Is Water Leaking From the Washing Machine Door? outlines common causes.
For a complete overview of door seal leaks and what to check first, see Washing Machine Door Seal Leaking: Causes and What to Check First.
A Practical Approach
Inspecting a washing machine door seal is a straightforward process that can often identify the source of a front-door leak. Many issues are caused by debris or minor buildup rather than structural damage.
Taking a few minutes to examine the gasket carefully can help you decide whether simple cleaning is enough or whether further action is needed. A structured inspection reduces guesswork and helps prevent unnecessary repairs.